A step-by-step walkthrough of every feature — from building your researcher profile
to managing a full grant application in one place.
Before You BeginFree to Use
Sign Up & Log In
GrantOtter is a web app — no installation needed. Open it at
grantotter.streamlit.app
in any browser. You'll be greeted with a sign-in screen before accessing the app.
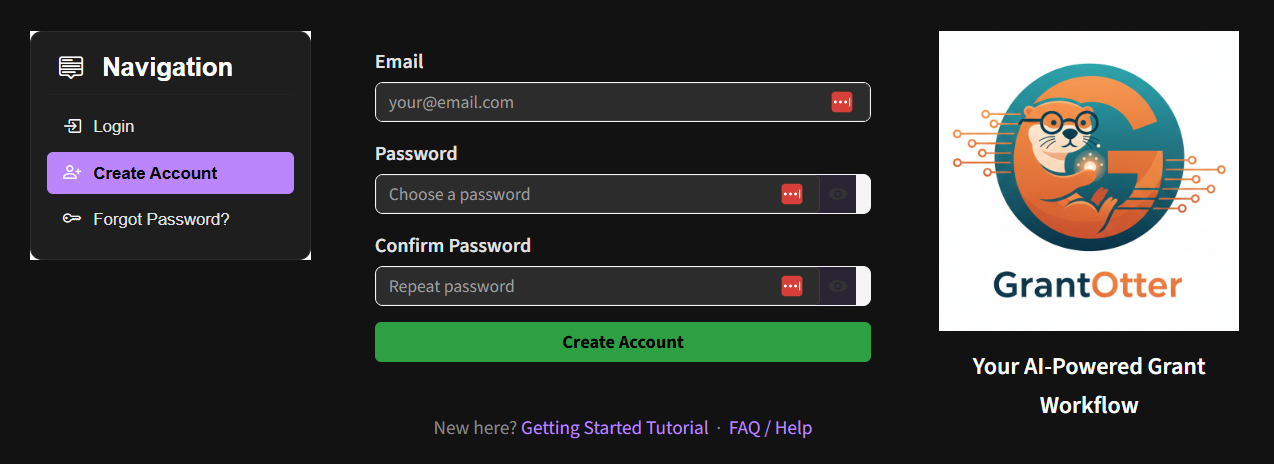
Creating an account
Click the Create Account tab on the welcome screen.
Enter your email address and choose a password (minimum 6 characters).
Click Create Account. You will be signed in automatically.
Enter your email and password in the Sign In tab and click Sign In.
💡 Note: To sign out, use the Sign Out button in the sidebar at any time. Your profile and saved data are stored securely and will be there when you sign back in.
🔒 Forgot your password? On the sign-in screen, click Forgot password?, enter your email, and click Send Reset Email. A reset link will arrive in your inbox within a few minutes.
The GrantOtter sign-up screen — click the Sign Up tab, fill in your email and password, then click Create Account.
Step 1Tab: My Workspace
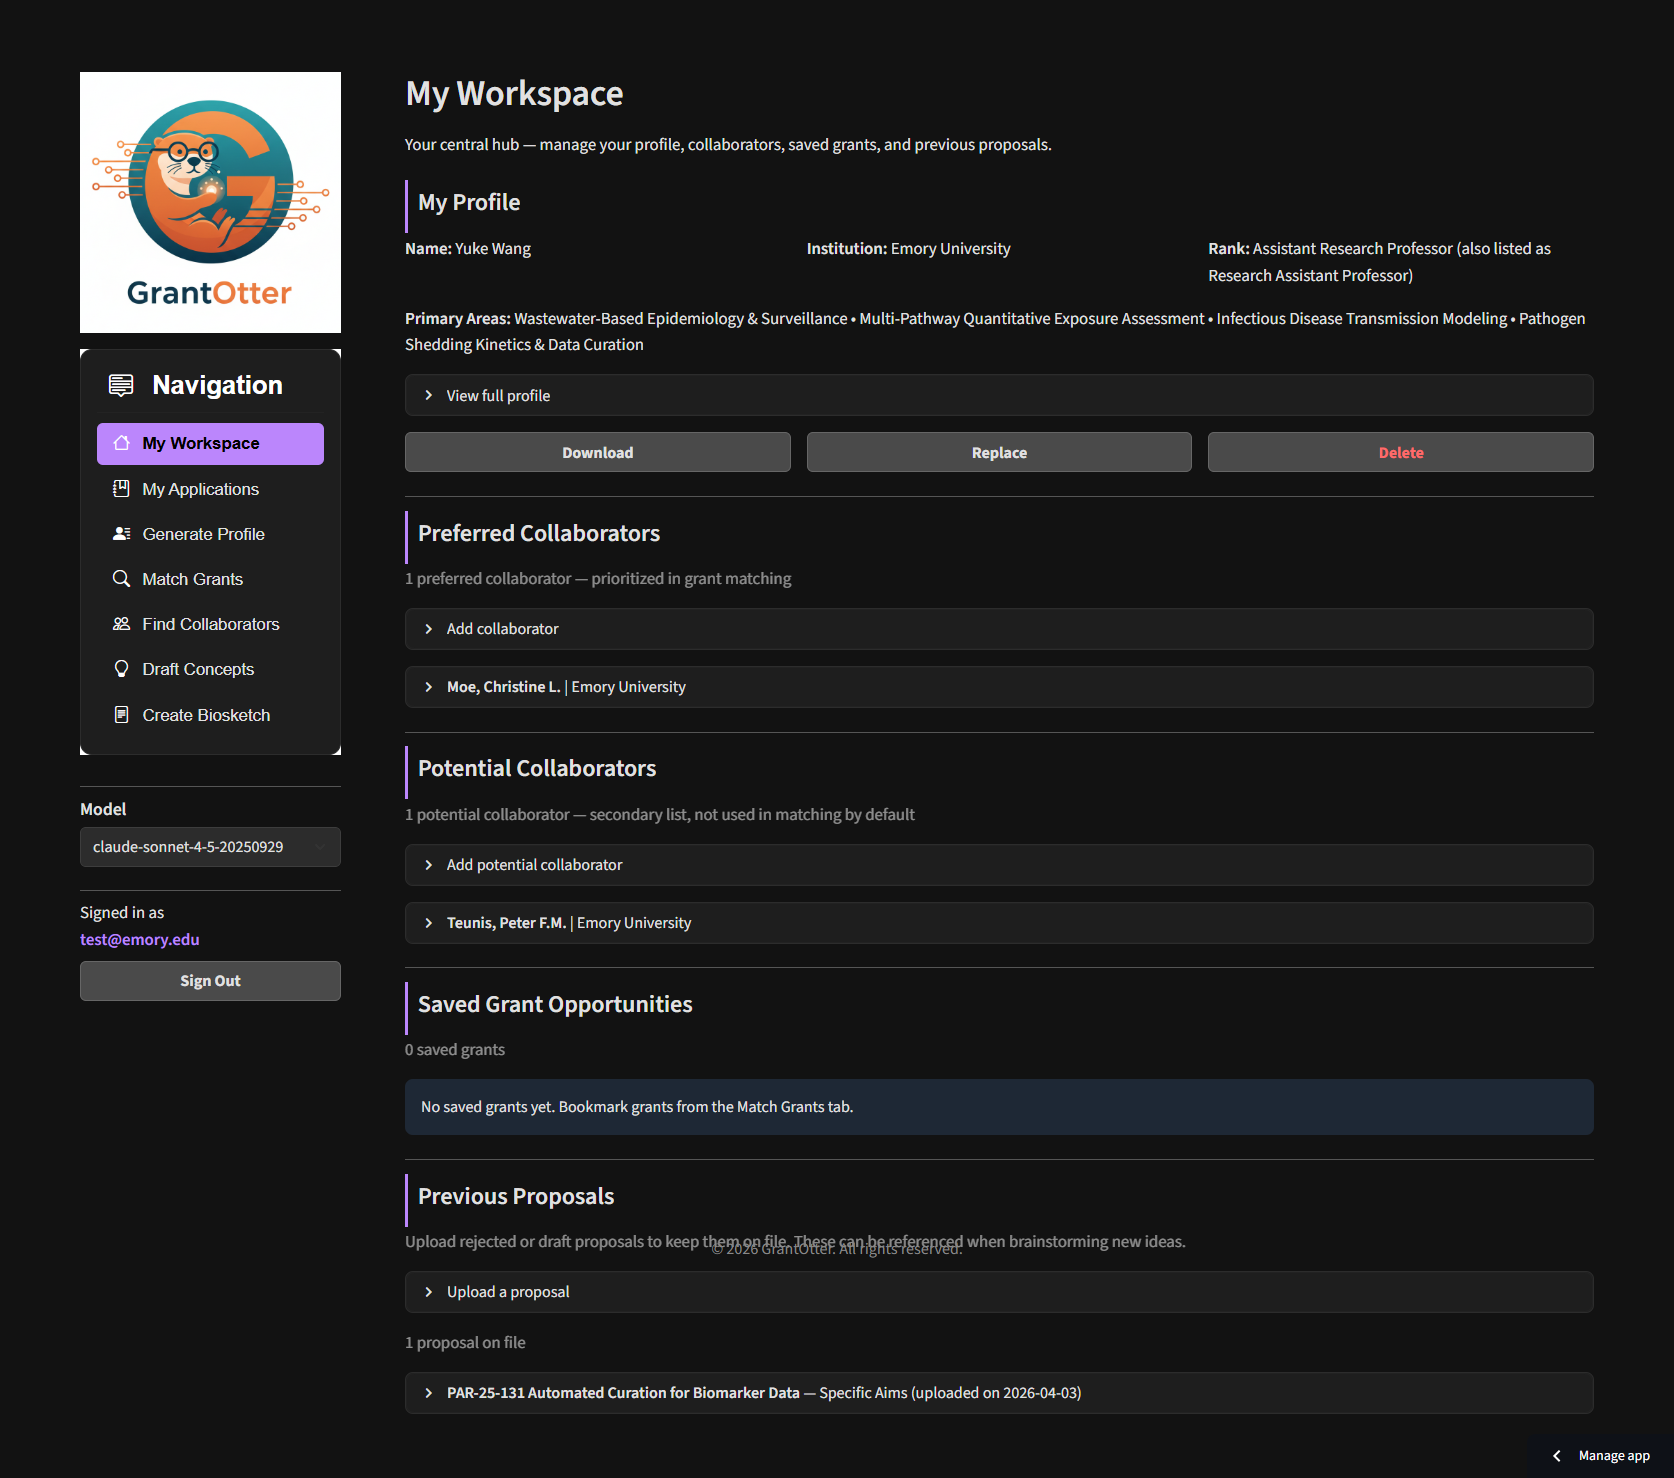
Meet My Workspace — Your Central Hub
🏠
My Workspace is the home base for everything you build in GrantOtter.
Before diving into any feature, it helps to know where things live. Your researcher
profile, preferred collaborators, saved grant opportunities, and previous proposals
are all managed from this single tab.
My Workspace has five sections:
My Profile — your AI-generated researcher profile (created in Step 2). Download it, replace it with an edited version, or delete it here. This profile powers grant matching, brainstorming, and biosketch generation.
Potential Collaborators — a discovery shortlist of researchers you're considering. Add anyone interesting from the chatbot or institution pool here while you explore. These are not yet part of your active team.
Preferred Collaborators — profiles of team members you've committed to working with. These appear in team selectors across the app and are used in grant matching and brainstorming. Promote researchers from Potential Collaborators to this list once you've decided to include them on a proposal.
Saved Grant Opportunities — grants you've bookmarked from the Match Grants results for later review.
Previous Proposals — upload specific aims pages, 2-pagers, or full proposals from past applications. These can be used as an alternative starting point for new grant matching.
My Workspace — your central hub for managing your profile, collaborators, saved grants, and previous proposals.
Step 2Tab: Generate Profile
Generate Your Researcher Profile
🏛
The profile is the foundation of everything in GrantOtter.
Every feature — grant matching, concept brainstorming, biosketch generation —
draws from your researcher profile .md file as its primary knowledge base.
The more complete and accurate your profile, the better every downstream result will be.
GrantOtter builds this profile by searching the web — pulling from Google Scholar,
PubMed, ORCID, ResearchGate, your institution's faculty page, NIH RePORTER, and
public grant databases. The result is far more than a list of publications. It includes:
Research expertise — scored areas with evidence and recent activity
Financial parameters — estimated salary, F&A rates, fringe rates, and budget implications for proposals
Grant suitability — readiness as PI vs. co-investigator, recommended mechanisms (R01, R21, K-awards, etc.)
Active & past grants — funding history with roles and amounts where publicly available
Collaborator network — frequent co-authors and key institutional partnerships
Your name and institution are the only required fields, but filling in additional
details significantly improves the profile — especially if your name is common
(e.g., "John Smith"). We also strongly recommend completing two fields that
directly improve your grant recommendations in the Match Grants tab:
Developing Research Interests — areas you're actively moving into,
even if you have few publications there yet. GrantOtter will prioritize these when
ranking grants, so you get recommendations that match where you're going, not just
where you've been.
Areas to Avoid — research areas you do not want to see in
grant recommendations. This filters out irrelevant matches so your ranked list stays focused.
💡 Tip: The best profile starts with your CV. Upload it directly in the form for the most accurate and complete result. If you don't have a CV ready, make sure these public profiles are up to date so the AI has good sources to draw from:
Google Scholar — a public profile with your publications and citation counts
ORCID — an up-to-date iD with your publications and grants linked
Faculty or personal website — an up-to-date page with your current role, affiliations, and research areas
How to do it
Open GrantOtter and go to the Generate Profile tab.
Enter your full name and institution (e.g., "Yuke Wang, Emory University"). These are the only required fields.
Optionally fill in Department, Rank, ORCID, and Google Scholar URL to improve accuracy — especially important if your name is common.
Optionally upload your CV (PDF, Word, Markdown, or plain text — up to 10 MB). When provided, the CV is treated as the highest-priority source of truth, and the AI fills gaps with web search. This is the fastest way to get an accurate profile.
Fill in Developing Research Interests (areas you're moving into) and Areas to Avoid (topics to exclude from recommendations). These two fields directly shape the grants you'll see in Match Grants.
Click Generate Profile. The AI will search the web and stream the profile live — this takes 2–3 minutes.
Once complete, review the profile and save it to your workspace.
Enter your name and institution, click Generate Profile, and watch your researcher profile stream in live.
Reviewing and updating your profile
The AI-generated profile is a strong first draft, but it's not always perfect.
Before using it for grant matching or brainstorming, take a few minutes to review it
and correct anything that doesn't look right. Profiles are plain Markdown files —
any text editor works. Things to check:
Expertise scores — the AI assigns each research area a score from 1–5. Adjust any that feel too high or too low.
Missing or incorrect affiliations — verify your department, secondary appointments, and collaborating centers.
Publication list — check that titles, years, and your authorship role are correct.
Grant history — confirm listed grants and your role on each (PI, co-I, key personnel).
Contact identifiers — make sure your ORCID iD and Google Scholar URL are correct.
How to update your profile
Go to My Workspace and find your saved profile under My Profile.
Click Download to save the .md file to your computer.
Open the file in any text editor (Notepad, VS Code, Obsidian, etc.) and review each section.
Make any corrections, then save the file.
Return to My Workspace, click Replace under My Profile, and upload the edited file.
Step 3Tab: Match Grants
Match Grants to Your Profile
GrantOtter compares your profile against hundreds of open funding opportunities —
federal grants from NIH, NSF, and DARPA, plus foundation and institutional grants —
using a three-stage pipeline:
1
Hard Filters
Instantly removes ineligible grants based on your eligibility type, application deadline, budget range, and funding mechanism.
↓
2
Rule-Based Scoring
Scores remaining grants across multiple dimensions — research expertise match, agency preference, career stage fit, and budget alignment — to surface the strongest candidates.
↓
3
LLM Evaluation
AI reads your profile and each top candidate in depth, ranks them by overall alignment, and writes a plain-language rationale for each recommendation.
You can match grants in two modes:
By Researcher Profile — matches based on your expertise, grant history, and research interests. Best for general discovery.
By Previous Proposal — paste or upload a previous proposal (specific aims page, 2-pager, or full proposal) and GrantOtter finds new funding opportunities aligned with that research direction. Ideal for finding a new home for a rejected proposal.
How to do it
Go to the Match Grants tab and choose your matching mode: Researcher Profile or Previous Proposal.
Set your filters:
Deadline — how many days ahead to include (e.g., 30 days)
Minimum award — e.g., $25,000 to filter out small pilot grants
Maximum award — enter 0 to set no maximum
Depending on your mode:
Researcher Profile — select My Profile from the dropdown.
Previous Proposal — select a saved proposal from My Workspace, or upload a PDF, Word, Markdown, or text file directly. Proposals saved in My Workspace (Specific Aims, 2-Pagers, Full Proposals) appear automatically in the dropdown.
Click Find My Grants. Results appear in about a minute.
Review the ranked list — each grant shows a fit score, rationale, and deadline.
Click Email Results to send the full report to your inbox, or save a promising grant directly to My Workspace.
💡 Tip: If you have a previously rejected proposal, upload it to My Workspace → Previous Proposals before running matching. It will be saved for reuse across sessions, and you can quickly find new funding opportunities aligned with that research direction without re-uploading each time.
Set your filters, select your profile, click Find My Grants, and review your ranked funding matches.
Step 4Tab: Find Collaborators
Find & Add Collaborators
GrantOtter gives you three ways to build your team: use the AI chatbot to discover
collaborators through your institution network, search the faculty pool directly by
name or keyword, or add colleagues you already know.
AI Collaborator Chatbot
The chatbot is the most powerful way to find collaborators. Describe the expertise
you're looking for in plain language, and the AI searches the institution network,
identifies the best-matched faculty, and — crucially — tells you how you're
already connected to each person through shared departments, centers,
co-authorships, or institutional affiliations. This makes it easy to make a warm
introduction rather than a cold outreach.
Go to the Find Collaborators tab and use the chatbot at the bottom of the page.
Describe what you're looking for in natural language — e.g., "I need a biostatistician with experience in longitudinal data and clinical trials" or "Who works on social determinants of health and has NIH R01 funding?"
The AI returns a list of faculty matches with expertise summaries and connection paths showing how you're linked through your institution network.
Save promising matches to your Potential Collaborators list in My Workspace — a holding list for people you're considering but haven't committed to yet.
Search the Institution Profile Pool
Prefer to browse directly? The institution profile pool lets you search by faculty
name or keyword and read full profiles.
Open the Institution Profile Pool section in the Find Collaborators tab.
Enter a name or keyword in the search box (e.g., "Lin" or "health disparities").
Browse the results and click on a profile to read their full expertise summary, publication record, and grant history.
Save profiles to your Potential Collaborators list for consideration, or directly to Preferred Collaborators if you're ready to include them on a proposal.
Describe the expertise you need in the chatbot, get matched faculty with connection paths through your institution network, and add them to your team.
Add a Known Collaborator
Use the Generate Profile tab to auto-generate a colleague's profile (enter their name + institution), or upload a profile file they've shared with you directly.
Save the profile as a Preferred Collaborator — preferred collaborators are used in grant matching and appear in team selectors across the app.
💡 Tip: Use Potential Collaborators as a discovery shortlist — save anyone interesting from the chatbot or profile pool, then promote them to Preferred Collaborators in My Workspace once you've decided to include them on a proposal. Only preferred collaborators are used in grant matching and team assembly.
Step 5Tab: My Applications
Manage Your Application
📖
My Applications is your end-to-end grant application hub.
Everything GrantOtter generates — profiles, concepts, biosketches — can be assembled
into a single application package and downloaded as a ZIP, ready to load into any AI
platform for the next stage of writing.
💡 Tip: Create your application as soon as you identify a grant you want to pursue — ideally right after Step 3 (Match Grants). That way, when you generate draft concepts (Step 6) and biosketches (Step 7), the Save to Application button will already have a destination to save to.
Each application in My Applications has five sections:
Overview — application title, status (Not Started / In Progress / Submitted / etc.), submission deadline, and notes for key contacts or internal reminders
Grant Opportunity — link the FOA or RFA from the grant repository so the full document is always at hand
Team Members — select the PI and co-investigators; their profiles are bundled into the ZIP download
Documents — attach draft concepts, biosketches, budget justification, letters of support, facilities pages, and any other files (PDF, Word, Markdown, or plain text)
Checklist — track every submission component with a color-coded due-date badge (red = overdue, orange = due within 7 days, yellow = within 30 days, green = more than 30 days out)
How to do it
Go to the My Applications tab and click New Application.
Give the application a name (e.g., "NIH R01 — Health Informatics 2026") and set the submission deadline.
In the Grant Opportunity section, search for and link the grant from the repository.
In the Team Members section, select yourself (My Profile) as PI and add co-investigators from your Preferred Collaborators list.
In the Documents section, upload supporting files or use the Save to Application button from the Draft Concepts or Create Biosketch tabs to attach outputs directly.
In the Checklist section, add each required submission component (specific aims, research strategy, biosketches, budget, letters of support, etc.) and assign due dates.
When ready, click Download All as ZIP — this bundles the grant document, all team profiles, and every attached file into a single package.
💡 Tip: Use the ZIP download as the starting point for your AI writing session.
Upload it to Claude, ChatGPT, or Gemini — the AI gets full context on the grant, your team, and your
draft concepts in one go. See the Power User section below.
Create a new application, link the grant, assemble your team, attach documents, and download everything as a ZIP.
Step 6Tab: Draft Concepts
Brainstorm Proposal Concepts
Once you've found a promising grant, GrantOtter can generate 2–3 tailored proposal
concepts aligned with the funding opportunity's priorities, your team's expertise,
and realistic budget constraints — in minutes.
How to do it
Go to the Draft Concepts tab.
Select a grant document. The built-in grant repository covers federal, foundation, and institutional funding opportunities. You have two options:
Pick from the grant repository list, or enter a federal grant number directly (e.g., PA-25-131), or
For any other grant — private funders, international agencies — paste the full grant information as plain text directly into the grant document field.
Select the PI — this can be your own profile (My Profile) or any preferred collaborator profile. The PI doesn't have to be you.
Add Co-Investigators — select any additional profiles from your Preferred Collaborators list.
Optionally add Guidance: a short paragraph describing your angle,
preliminary data, or any constraints. The more detail you provide, the more
targeted the concepts will be.
Click Generate Concepts. GrantOtter produces 2–3 proposal concepts, each with:
A working title and central hypothesis
Specific aims outline
Innovation score and rationale
Estimated budget breakdown
Download the brainstorming report as a Markdown file, or use Save to Application to attach it directly to an application. Note: you need to create an application in My Applications first (Step 5) before this option appears.
Select a grant, choose your PI and co-investigators, add optional guidance, and click Generate Concepts to get 2–3 tailored proposal ideas.
Step 7Tab: Create Biosketch
Generate an NIH Biosketch
GrantOtter auto-generates a properly formatted NIH Biographical Sketch (Format Page)
from your researcher profile. It pulls your publications, positions, and personal
statement — giving you a solid first draft in seconds instead of hours.
How to do it
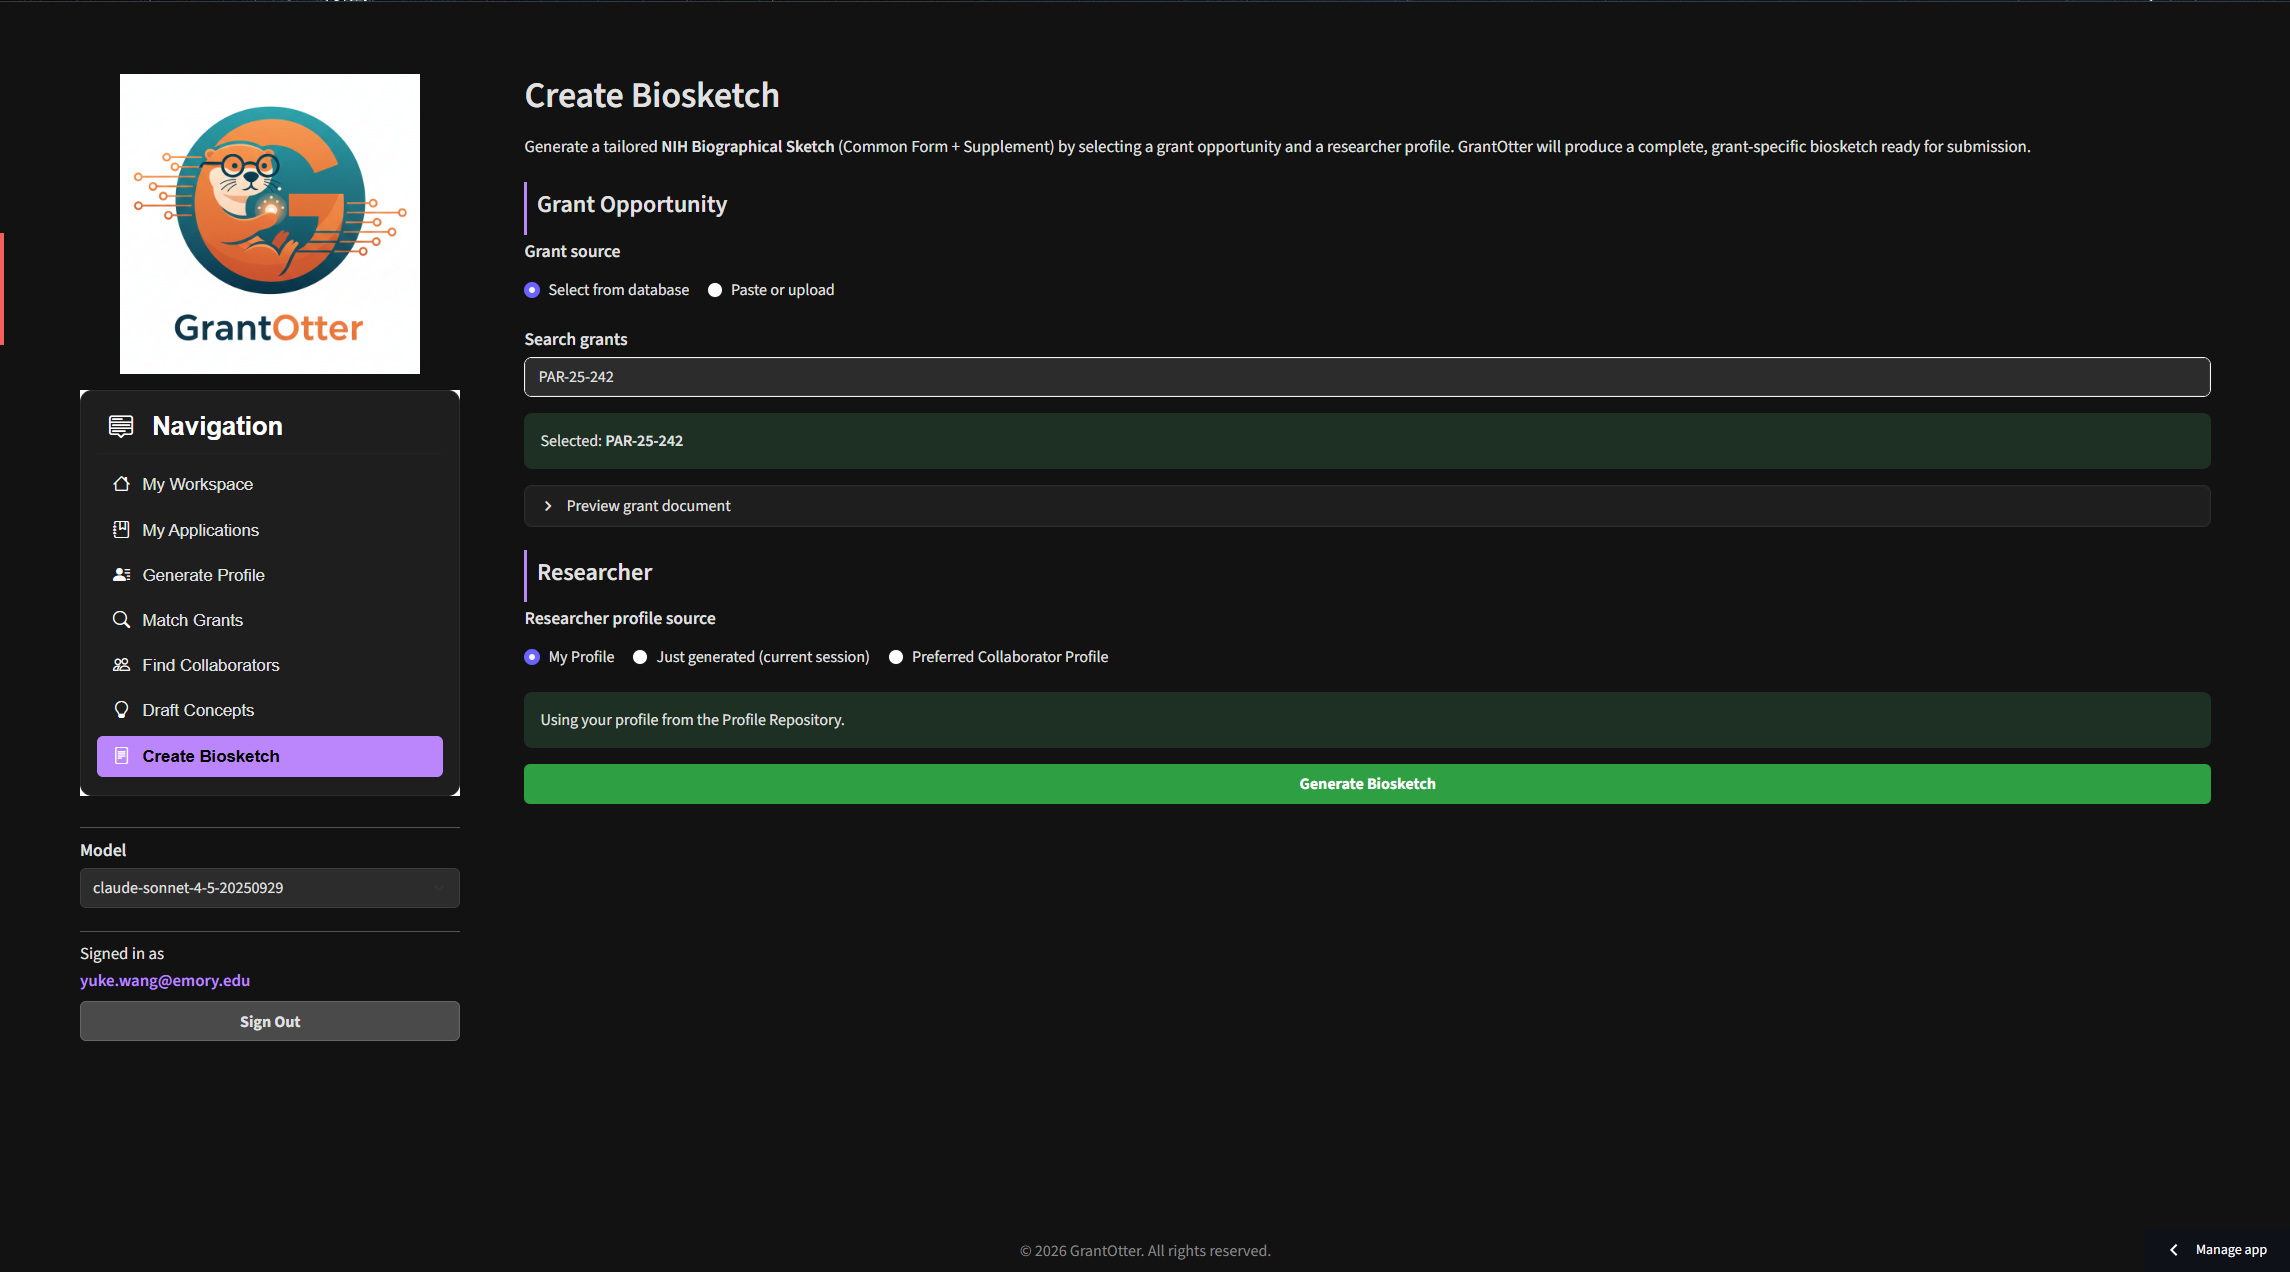
Go to the Create Biosketch tab.
Select the target grant from the dropdown (the biosketch will be tailored to that FOA's scope).
Select the researcher profile to generate the biosketch for.
Click Generate Biosketch. GrantOtter drafts all four sections:
Personal Statement
Positions, Scientific Appointments & Honors
Contributions to Science
Research Support
Download the output as a Markdown file, or use Save to Application to attach it directly to an application. Note: you need to create an application in My Applications first (Step 5) before this option appears. Use the downloaded file as a reference to fill in the NIH Biographical Sketch common form on SciENcv.
💡 Tip: Always review the Contributions to Science section
carefully. The AI selects your most relevant publications for the target grant — but you
should verify dates, journal names, and authorship order before entering them into SciENcv.
Select a target grant and researcher profile, click Generate Biosketch, and get a formatted NIH Biographical Sketch draft in seconds.
⚡ Power UserWorks with Claude · ChatGPT · Gemini
Take Your Proposal Further with AI Conversation
GrantOtter generates a set of rich, structured documents — your researcher profile,
a grant summary, a brainstorming report, and a biosketch draft. Together, these files
form a ready-made knowledge base that you can hand off to any
general-purpose AI assistant to continue developing your proposal through natural
language conversation.
Instead of starting from a blank page, you're starting with context the AI can actually
use — your expertise, your team, the grant's requirements, and a set of targeted concepts.
The difference in output quality is significant.
How to do it
In My Applications, assemble your full application package — link the grant, add your team, attach your draft concepts and biosketches.
Click Download All as ZIP. This bundles everything into a single file:
The grant FOA/RFA document
Your researcher profile and all team member profiles
Draft concept reports and biosketch drafts
Any other documents you've attached
Open your AI app of choice — Claude, ChatGPT, or Gemini — and create a new project or conversation.
Upload the ZIP contents as context attachments.
Start the conversation with a clear instruction. For example:
"Based on my profile and the brainstorming report, draft a one-page Specific Aims section for the PA-25-131 proposal. Use NIH formatting conventions."
"Draft a short email I can send to Dr. [Name] inviting them to join this proposal as a co-investigator. Mention their expertise in [X] and explain how it complements the team."
Iterate through conversation — ask the AI to tighten the language, adjust the framing, or tailor the tone. Each round takes seconds, not hours.
💡 Real example: In a recent session, a researcher uploaded their GrantOtter profile, a collaborator's profile, and a brainstorming report into Claude. In one conversation, they drafted a complete Specific Aims page in a Word-ready format, then immediately drafted a recruitment email to bring a colleague on board as co-investigator — both in under 2 minutes.
Download the ZIP from My Applications, upload the contents into Claude or ChatGPT, and use them as context to draft Specific Aims, recruitment emails, and more — in seconds.
You're Ready to Go
You've seen every major feature. The full workflow is:
Generate profile → Match grants → Find collaborators → Manage your application → Draft concepts → Create biosketches.
Most researchers complete the profile-to-matching step in under 30 minutes.
📖
Start an Application
Open My Applications, create your first application, link a grant, and start building your submission package.
📰
Stay Current
Subscribe to the Weekly Funding Feed for a curated digest of new NIH, NSF, and DARPA opportunities every Monday.
📩
Share with Your Department
Run GrantOtter for your whole team in a department demo session — book a live walkthrough or share the link with colleagues.